Markers
Markers are commonly used in GeoWork to mark points of interest (POI) on the map. Examples can be: a solar panel to control, a tree that needs to be treated against some desease, an injured animal to rescue, etc.
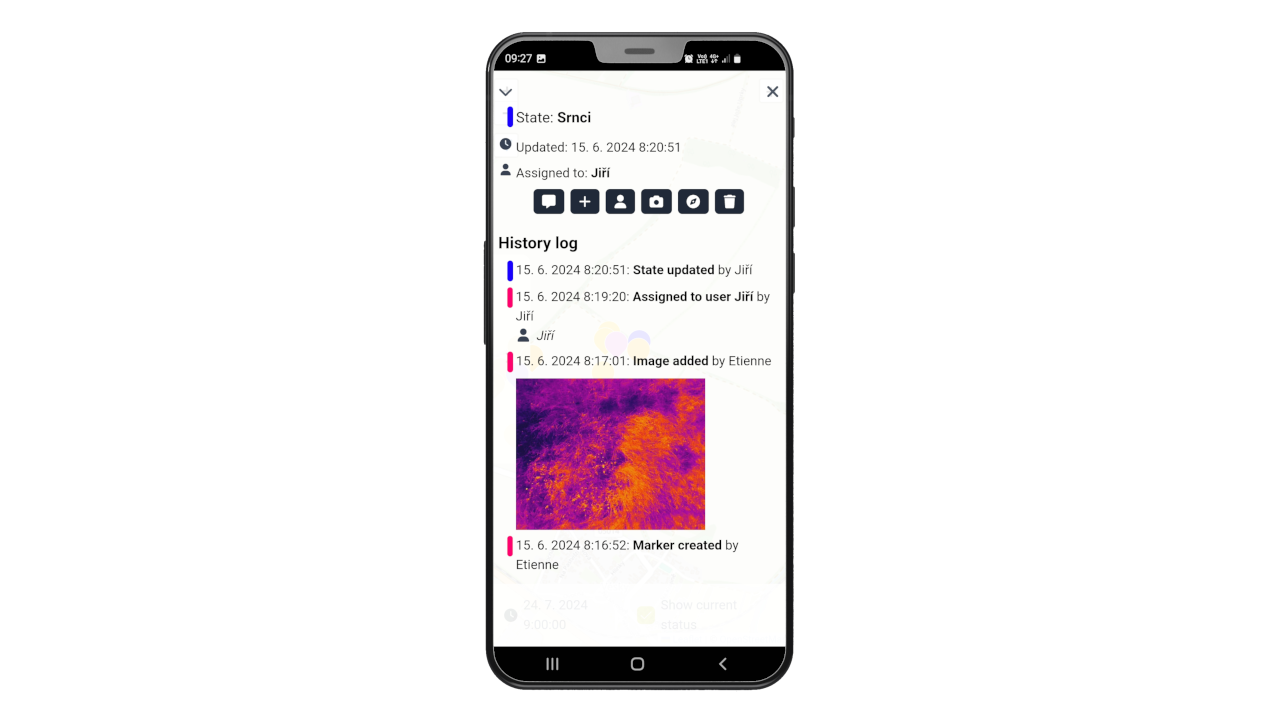
Each marker can evolve after its creation and keeps trace of all changes made inside through its own history log:
- Name
- State
- Assigned user
- Comments
- Photos
- more...
This gives you the opportunity to know everything about what was done, when, where, how, by who, with attachements for further information.
Example of the life of a marker: the project administrator sees something on the orthomosaic layer of his site that looks strange. He creates a marker at that position and gives it the state "to check". The administrator adds a comment to the marker like "This needs to be check. Please, take photos." Then, the administrator assignates a member of the team to this marker. This member goes to the marker position, takes photos with his mobile phone, store them in the marker, adds a comment like "This was nothing, cf. photos taken" and changes the marker state to "checked -> nothing". In another case, the state could have been "checked -> fixed" or "checked -> replaced". The administrator controls photos and, considering the task done, archives the marker.
Marker States
Each marker has a so-called "state", being just predefined labels indicating the state of a marker, like "to check" or "done". States are hierarchical, so that a state can be the parent of sub-states and so on. For each given project, states can be edited by the owner or the manager. If no state is created, it will be impossible to create any marker.
To create states:
- Enter/create your GeoWork project - see this part of the documentation to create one if needed.
- Press the "Project details" button - A new model window will appear.
- Press the "Manage marker" button - This will open all the marker options.

Now you can either:
a) Select a template:
- Click on "Select template"
- Select the template you want to use from the list
or
b) Create a State:
- Click on "Add state to set"
- Name the state and select it's color
- Press the green "Create new state" button
or
c) Create a Sub-State:
- Under the state to which you want to add a sub-state, click on "Create sub-state""
- Name the state and select it's color
- Press the green "Create new state" button
How to add a Marker
Be sure marker states are present in the project before trying to create any marker.
- Enter/create your GeoWork project - see this part of the documentation to create one if needed.
- Create the marker - Create a marker using one of the following options:
- Press the "Create Marker" button under the "Markers" category in the sidebar - An information pop up saying "Click on map to add new marker" appears. Click on the map to the place the new marker.
- Press the "+" icon in the top right corner - An information pop up saying "Click on map to add new marker" will appear on the top of your screen. Click on the map to the place the new marker
- Make a right-click (desktop) or a long press (mobile) on the map where you want to place the new marker.
- Select the marker' state - Do so by clicking on either of the Marker state options.
How to add a Marker from photo
Be sure marker states are present in the project before trying to create any marker.
- Enter/create your GeoWork project - see this part of the documentation to create one if needed.
- Pres the "Create marker from photo" under the "Markers" category - A new model window will appear.
- Add a photo by either:
- choosing one from your device's files - click on the gray "Choose file" button, click on the photo you want to add, and upload the photo by clicking the green "Import photo" button, or
- taking a photo - click on the gray "Take a photo" button - take a photo using the camera, confirm its usage by clicking the check icon on the right.
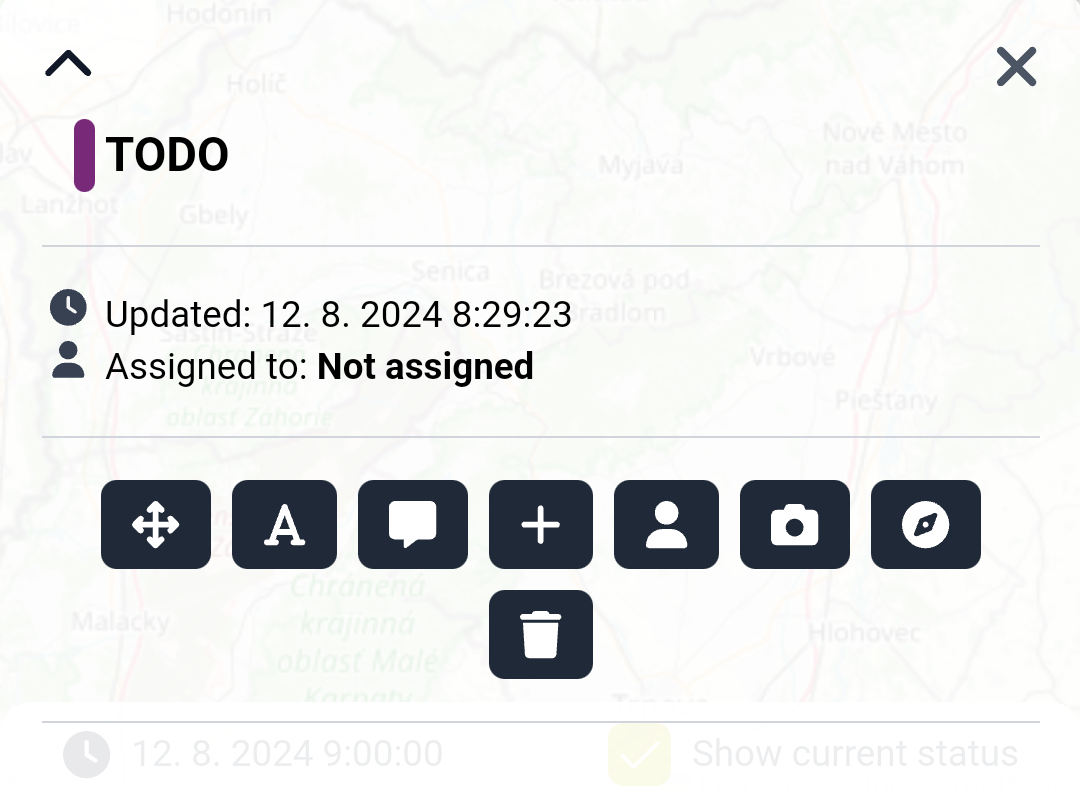
The Marker Toolbox
Each marker has its own so-called "toolbox", appearing when the marker is active. The toolbox allows to edit the marker it belongs (change the name, add a photo, write a comment, and so on) and to see the history of all changes since its creation.
To access the toolbox of any marker:
- Enter/create your GeoWork project - see this part of the documentation to create one if needed. It must contain at least one marker.
- Select the marker - do so by clicking on it on the map or selecting it from the list on the sidebar. It will contain these information:
- Marker name and state - A small colored shape will indicate the state of the marker.
- Last Update time - Every time a change is done to the marker, this information changes, so that it is clear when the states, comments, etc. were made.
- Assigned user's name (only if edited)
- Edition tools - A set of icons to click to make changes on the marker.
- History log - The history log contains a trace of all changes made on the marker asd well as photos and/or comments added by users.
Edit a Marker
A marker can be edited at all times, by all roles. These edits are done using edition tools placed at the top of the marker toolbox:
To edit a marker:
- Enter/create your GeoWork project - see this part of the documentation to create one if needed. It must contain at least one marker.
- Select the marker you want to edit - do so by clicking on it on the map or selecting it from the list on the sidebar.
- Complete the changes you want to do by clicking on corresponding icons:
-
Move the marker
- Click on the "Pan" icon (first button in order) - the marker will now change its color to a darker blue.
- Move the marker to the new position - nothing more is needed, the marker will change positon instantly.
-
(Re)Name the marker
- Click on the "A" icon (second button in order) - a new box saying "Name marker" will appear.
- Click on the text box and type the name of the marker.
- Press the green "Rename" button (or the gray "Cancel" button if you change your mind).
-
Add a comment to the marker
- Click on the "Text-bubble" icon (third button in order) - a new box saying "Add comment" will appear.
- Check the text box and type your comment.
- Apply the comment by pressing the green "Add" button (or the gray "Cancel" button if you change your mind).
-
Change the state of the marker
- Click on the "Update" icon (fourth in order) - a new box asking you to "Select state" will appear.
- Select either option based on which of the Marker state you want it to be.
-
Assign a user to the marker
- Click on the "user profile" icon (fifth in position) - a new box will appear.
- Click on the selection box.
- Choose the user to who you want to assing this marker.
- Press the green "Submit" button to confirm (or the gray "Cancel" button if you changed your mind).
-
Attach a photo to the marker
- Click on the "camera" icon (sixth in position) - a new box will appear.
- Add a photo by either :
- choosing one from your device's files - click on the gray "Choose file" button, click on the photo you want to add, and upload the photo by clicking the green "Import photo" button.
- taking a photo - click on the gray "Take a photo" button, take a photo using the camera like mode that will appear, confirm its usage by clicking the check icon on the right.
-
History log
To access the history log of a marker:
- Enter/create your GeoWork project - see this part of the documentation to create one if needed. It must contain at least one marker.
- Select the marker you want to see the history - do so by clicking on it on the map or selecting it from the list on the sidebar.
- If the log is not visible, click the "^" ("arrow up") button - you shall now see the whole log of the marker.
Marker Compass
When on the field, GeoWork is able to guide the user toward a given marker, playing the role of a compass pointing right to it.
To activate the compass:
The app is not aware in any sort of your enviroment, so it can not make you avoid obstacles of any kind. Please be cautious while following the lead, and look precisely where you are going.
- Enter/create your GeoWork project - see this part of the documentation to create one if needed. It must contain at least one marker.
- Select the marker you want to reach - do so by clicking on it on the map or selecting it from the list on the sidebar.
- Click the "compass" icon - a green arrow will appear showing you the direction. Below, you'll see written the distance of the object, and the position accuracy.
- Follow the instructions of the green arrow
- Reach the marker - do what you've intended to once you've reached the location.
- Mark the marker state - once reached, click on the green "Mark as" button, and select one of the Marker state based on the situation.
Delete a marker
In GeoWork, when a marker is deleted, it's first actually archived, so that it can still be accessed (and possibly restored) after deletion. To totally delete a marker, this must be deleted a second time from the archive list.
How to archive a marker
- Enter/create your GeoWork project - see this part of the documentation to create one if needed. It must contain at least one marker.
- Delete the marker - options are:
- Through the toolbox:
- Select the marker you want to delete - do so by clicking on it on the map or selecting it from the list on the sidebar.
- Click on the "trash" button - in the toolbox, click on the trash icon.
- Through the sidebar - click on the trash icon beside the marker's name in the sidebar, in the "Markers" section.
- Through the toolbox:
How to totally delete an archived marker
- Enter/create your GeoWork project - see this part of the documentation to create one if needed. It must contain at least one archived marker.
- Delete the marker - in the side bar, in the "Markers" section, look for the "Archived markers" sub-section. Find there your marker and click on the trash icon.
Once totally deleted, a marker can't be restore.
How to filter markers by user
Often it can be useful to display only markers assigned to a given user. For example, one user can want to see only markers to which he is assigned himself. Or, the manager can want to see markers assigned to a given user.
Here is how to do:
- Enter/create your GeoWork project - see this part of the documentation to create one if needed. It must contain at least one marker.
- **Filter markers ** - in the side bar, in the "Markers" section, click on the drop-down list besides "Filter markers by assignment" and choose the user.