Layers
In GeoWork, GeoTIFF orthophotos can be imported in projects as "layers" be superposed to the basemap. They are useful to monitor the evolution of a site over time (vegetation health, solar panel efficiency, and so on). Layers can be either RGB or single-band raster data (eg. NDVI indexes) that can be colorized directly in GeoWork given predefined colormaps. While uploading a layer to a project, it must be placed into a layer group (each project has its own groups). On the basemap, then, only one layer per group can be displayed at a time: the one being the closest from the date indicated by the timeline at the bottom of the basemap.
Only owners, managers and pilots can create and remove layers.
How to create layer groups
Prior to layer upload, at least one layer group must exist. Here is how to create such groups:
- Enter/create your GeoWork project - see this part of the documentation to create one if needed.
- Click on the "Project Details" button - in the sidebar.
- Click on the "Edit Project Details"
- Edit the Layer Groups field - give there the name of wanted layer groups
How to create a layer
GeoWork supports only orthomosaic files in GeoTIFF format. The import of such files is done as following:
- Enter/create your GeoWork project - see this part of the documentation to create one if needed.
- Click on the "Upload new layer" button - new model window will appear.
- Fill in the layer details
- Layer date - Date when the layer was captured.
- Custom name - Custom name of the layer. This field is optional. If you don't fill it, the layer will be named by the date.
- Description - Description of the layer. This field is optional.
- Layer group - Select the layer group where to store the layer.
- Style - Select the default style of the layer (see below for more details about styles). In case of RGB layer, the "raster" style can be used.
- Geotiff file - Upload the GeoTIFF file.
- Click on the "Upload layer" button - Your layer will be created, which can take some time, depending on the size of the file and your internet connection speed. After the layer is created, you will be redirected to the project, where you can see it on the basemap.
In case of issues during the import (eg. invisible layer), please double-check the format of the GeoTIFF data. In case of persistence of troubles, try changing the projection of the GeoTIFF or the tool generating it. For example, tools like WebODM are known to generate compatible orthophotos.
Layer styles
In GeoWork, layers "styles" defines how they will be displayed:
- Raster - Raster style is used for displaying the layer as it is, with no additional styling.
- Other styles - Other styles are used for displaying the layer with additional coloring. These styles are provided by the system administrator and can change over time. In case of missing style, please make a demand to the system administrator. Available styles are visible in the drop-down menu when creating a new layer with their color representation.
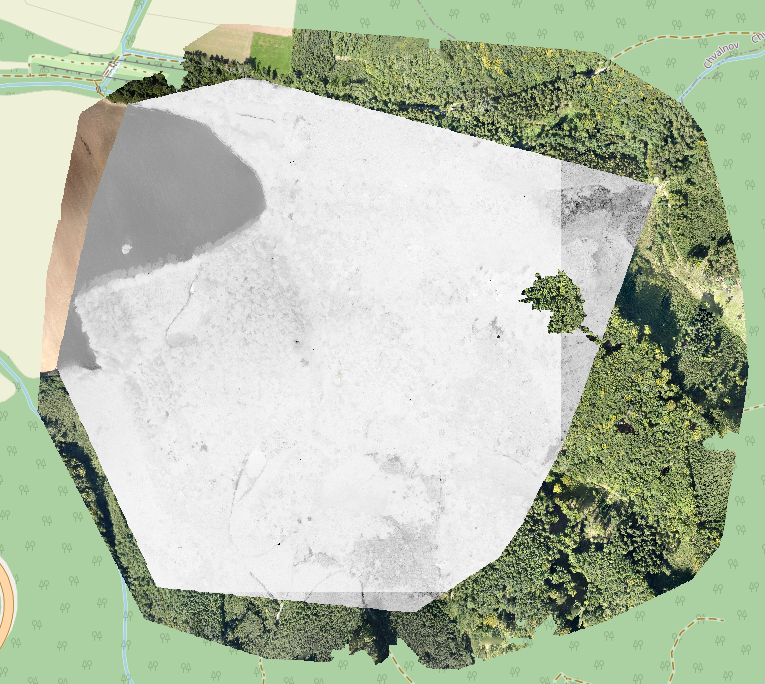
Here is an example of layers displayed with the raster style. That is, they are displayed "as is.", without any coloring. The bottom layer is a RGB layer which naturally contains some colors. The top one is single-band, and so is displayed with a gray scale.
Here, a colorizing style (red-to-green) is applied to the the single-band layer:
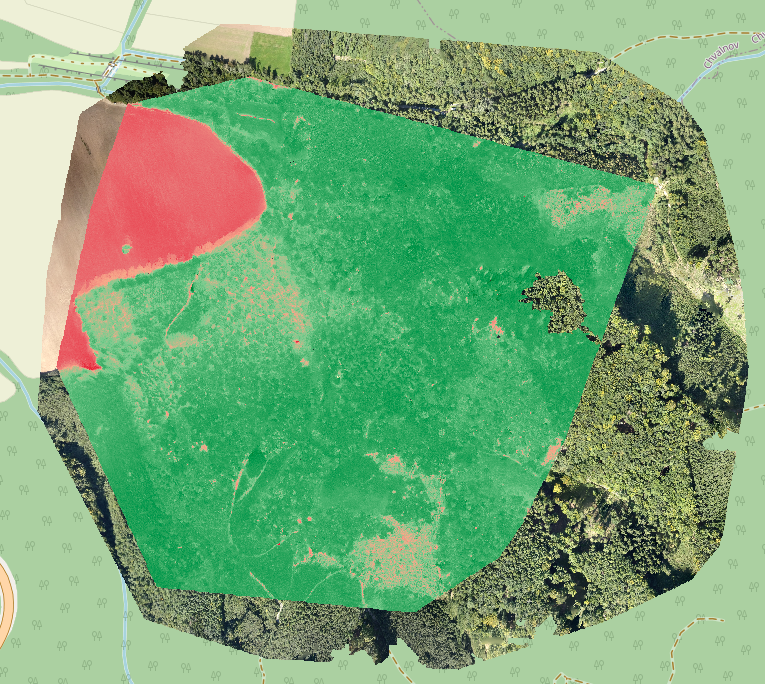
As visible, every layer can have a different style.
How to remove a layer
- Enter/create your GeoWork project - see this part of the documentation to create one if needed.
- Look for the layer you want to remove - Look for the layer you want to remove in the project sidebar in the layers section.
- Click on the "Trash" icon - Click on the "Trash" icon next to the layer name. The layer will be removed from the project.
This action can't be undone, so be careful when removing layers.
How to change the style of a layer
Note that changing the style of the layer doesn't change the style of the layer permanently. The layer will be displayed with the new style only for the current session. If you want to change the style permanently, you need to reupload the layer with the new style.
- Enter/create your GeoWork project - see this part of the documentation to create one if needed.
- Look for the layer you want to edit - Look for the layer you want to edit in the project sidebar in the layers section.
- You can see drop-down menu with styles - Click on the drop-down menu with styles which is next to the layer name.
- Select the style you want to apply - Select the style you want to apply to the layer. The layer will be updated and shown with the new style.
How to change layer visibility
- Enter/create your GeoWork project - see this part of the documentation to create one if needed.
- Look for the layer you want to edit - Look for the layer you want to remove in the project sidebar in the layers section.
- Change the visibility of the layer - two options:
- Hide/Show the layer totally - Click on the checkbox next to the layer name. The layer will be hidden from the map. Click on the checkbox again to show the layer on the map.
- Change the layer opacity - You can change the layer opacity by moving the slider under the layer name. The layer will be displayed with the new opacity.
How to change the displayed date
To change the displayed date, and so to choose which layer must be visible on over the basemap for each layer group, you can use the timeline:
- Enter/create your GeoWork project - see this part of the documentation to create one if needed.
- Activate the timeline - at the bottom , deselect the "Show current status" checkbox if not yet.
- Change the displayed date - slide the grip to the left or right to travel in time ; if needed, use the plus and minus buttons next to the slider to adapt the slider range.
If there are no layers available for the selected date, the map will be empty.
How to access the complete list of all layers
By default, only layers corresponding to the displayed date are listed in the sidebar of the project. If you want to see all layers, check the "Show inactive layers" checkbox in the sidebar's layers section.